Trying to write down some of the things I did to get this working
What Shelly 3em publishes
You can see all the topics of the mqtt broker by doing like this :
mosquitto_sub -d -v -t “#”
The ‘#’ means ALL topics, and by doing this I will get something like this :
|
1 2 3 4 5 6 7 8 9 10 11 12 13 14 15 16 17 18 19 20 21 22 23 24 25 26 27 28 29 30 31 32 33 34 35 36 37 38 39 40 41 42 43 44 45 46 47 48 49 50 51 52 53 54 55 56 57 58 59 60 61 62 63 64 65 66 67 68 69 70 71 72 73 74 75 76 77 78 79 80 81 82 83 84 85 86 87 88 89 90 91 92 93 94 95 96 97 98 99 100 |
tobias@raspberrypi:~ $ mosquitto_sub -d -v -t "#" Client (null) sending CONNECT Client (null) received CONNACK (0) Client (null) sending SUBSCRIBE (Mid: 1, Topic: #, QoS: 0, Options: 0x00) Client (null) received SUBACK Subscribed (mid: 1): 0 Client (null) received PUBLISH (d0, q0, r1, m0, 'shellies/listerby/online', ... (4 bytes)) shellies/listerby/online true Client (null) received PUBLISH (d0, q0, r1, m0, 'shellies/listerby/announce', ... (144 bytes)) shellies/listerby/announce {"id":"listerby","model":"SHEM-3","mac":"C45BBE6B2438","ip":"192.168.68.112","new_fw":false,"fw_ver":"20220324-123835/v1.11.8-3EM-fix-g0014dcb"} Client (null) received PUBLISH (d0, q0, r1, m0, 'shellies/listerby/info', ... (1053 bytes)) shellies/listerby/info {"wifi_sta":{"connected":true,"ssid":"famEriksson","ip":"192.168.68.112","rssi":-70},"cloud":{"enabled":false,"connected":false},"mqtt":{"connected":true},"time":"21:44","unixtime":1656186279,"serial":1,"has_update":false,"mac":"C45BBE6B2438","cfg_changed_cnt":0,"actions_stats":{"skipped":0},"relays":[{"ison":true,"has_timer":false,"timer_started":0,"timer_duration":0,"timer_remaining":0,"overpower":false,"is_valid":true,"source":"input"}],"emeters":[{"power":3146.87,"pf":1.00,"current":13.83,"voltage":227.95,"is_valid":true,"total":3926419.2,"total_returned":537.4},{"power":2722.25,"pf":1.00,"current":11.85,"voltage":229.71,"is_valid":true,"total":2290723.1,"total_returned":101.5},{"power":2720.61,"pf":1.00,"current":11.86,"voltage":229.33,"is_valid":true,"total":2185493.1,"total_returned":561.9}],"total_power":8589.73,"fs_mounted":true,"update":{"status":"unknown","has_update":false,"new_version":"","old_version":"20220324-123835/v1.11.8-3EM-fix-g0014dcb"},"ram_total":49440,"ram_free":30280,"fs_size":233681,"fs_free":155620,"uptime":7} Client (null) received PUBLISH (d0, q0, r1, m0, 'shellies/listerby/relay/0', ... (2 bytes)) shellies/listerby/relay/0 on Client (null) received PUBLISH (d0, q0, r1, m0, 'shellies/listerby/emeter/0/power', ... (6 bytes)) shellies/listerby/emeter/0/power 432.77 Client (null) received PUBLISH (d0, q0, r1, m0, 'shellies/listerby/emeter/0/pf', ... (4 bytes)) shellies/listerby/emeter/0/pf 0.83 Client (null) received PUBLISH (d0, q0, r1, m0, 'shellies/listerby/emeter/0/current', ... (4 bytes)) shellies/listerby/emeter/0/current 2.24 Client (null) received PUBLISH (d0, q0, r1, m0, 'shellies/listerby/emeter/0/voltage', ... (6 bytes)) shellies/listerby/emeter/0/voltage 232.12 Client (null) received PUBLISH (d0, q0, r1, m0, 'shellies/listerby/emeter/0/total', ... (9 bytes)) shellies/listerby/emeter/0/total 3939215.8 Client (null) received PUBLISH (d0, q0, r1, m0, 'shellies/listerby/emeter/0/total_returned', ... (5 bytes)) shellies/listerby/emeter/0/total_returned 537.4 Client (null) received PUBLISH (d0, q0, r1, m0, 'shellies/listerby/emeter/0/energy', ... (3 bytes)) shellies/listerby/emeter/0/energy 472 Client (null) received PUBLISH (d0, q0, r1, m0, 'shellies/listerby/emeter/0/returned_energy', ... (1 bytes)) shellies/listerby/emeter/0/returned_energy 0 Client (null) received PUBLISH (d0, q0, r1, m0, 'shellies/listerby/emeter/1/power', ... (5 bytes)) shellies/listerby/emeter/1/power 83.62 Client (null) received PUBLISH (d0, q0, r1, m0, 'shellies/listerby/emeter/1/pf', ... (4 bytes)) shellies/listerby/emeter/1/pf 0.79 Client (null) received PUBLISH (d0, q0, r1, m0, 'shellies/listerby/emeter/1/current', ... (4 bytes)) shellies/listerby/emeter/1/current 0.45 Client (null) received PUBLISH (d0, q0, r1, m0, 'shellies/listerby/emeter/1/voltage', ... (6 bytes)) shellies/listerby/emeter/1/voltage 233.39 Client (null) received PUBLISH (d0, q0, r1, m0, 'shellies/listerby/emeter/1/total', ... (9 bytes)) shellies/listerby/emeter/1/total 2298273.3 Client (null) received PUBLISH (d0, q0, r1, m0, 'shellies/listerby/emeter/1/total_returned', ... (5 bytes)) shellies/listerby/emeter/1/total_returned 101.5 Client (null) received PUBLISH (d0, q0, r1, m0, 'shellies/listerby/emeter/1/energy', ... (2 bytes)) shellies/listerby/emeter/1/energy 83 Client (null) received PUBLISH (d0, q0, r1, m0, 'shellies/listerby/emeter/1/returned_energy', ... (1 bytes)) shellies/listerby/emeter/1/returned_energy 0 Client (null) received PUBLISH (d0, q0, r1, m0, 'shellies/listerby/emeter/2/power', ... (6 bytes)) shellies/listerby/emeter/2/power 162.23 Client (null) received PUBLISH (d0, q0, r1, m0, 'shellies/listerby/emeter/2/pf', ... (4 bytes)) shellies/listerby/emeter/2/pf 0.71 Client (null) received PUBLISH (d0, q0, r1, m0, 'shellies/listerby/emeter/2/current', ... (4 bytes)) shellies/listerby/emeter/2/current 0.97 Client (null) received PUBLISH (d0, q0, r1, m0, 'shellies/listerby/emeter/2/voltage', ... (6 bytes)) shellies/listerby/emeter/2/voltage 232.96 Client (null) received PUBLISH (d0, q0, r1, m0, 'shellies/listerby/emeter/2/total', ... (9 bytes)) shellies/listerby/emeter/2/total 2187798.7 Client (null) received PUBLISH (d0, q0, r1, m0, 'shellies/listerby/emeter/2/total_returned', ... (5 bytes)) shellies/listerby/emeter/2/total_returned 561.9 Client (null) received PUBLISH (d0, q0, r1, m0, 'shellies/listerby/emeter/2/energy', ... (3 bytes)) shellies/listerby/emeter/2/energy 140 Client (null) received PUBLISH (d0, q0, r1, m0, 'shellies/listerby/emeter/2/returned_energy', ... (1 bytes)) shellies/listerby/emeter/2/returned_energy 0 Client (null) received PUBLISH (d0, q0, r1, m0, 'shellies/announce', ... (144 bytes)) shellies/announce {"id":"listerby","model":"SHEM-3","mac":"C45BBE6B2438","ip":"192.168.68.112","new_fw":false,"fw_ver":"20220324-123835/v1.11.8-3EM-fix-g0014dcb"} Client (null) received PUBLISH (d0, q0, r0, m0, 'shellies/listerby/emeter/0/power', ... (6 bytes)) shellies/listerby/emeter/0/power 437.96 Client (null) received PUBLISH (d0, q0, r0, m0, 'shellies/listerby/emeter/0/pf', ... (4 bytes)) shellies/listerby/emeter/0/pf 0.84 Client (null) received PUBLISH (d0, q0, r0, m0, 'shellies/listerby/emeter/0/current', ... (4 bytes)) shellies/listerby/emeter/0/current 2.25 Client (null) received PUBLISH (d0, q0, r0, m0, 'shellies/listerby/emeter/0/voltage', ... (6 bytes)) shellies/listerby/emeter/0/voltage 232.10 Client (null) received PUBLISH (d0, q0, r0, m0, 'shellies/listerby/emeter/0/total', ... (9 bytes)) shellies/listerby/emeter/0/total 3939215.8 Client (null) received PUBLISH (d0, q0, r0, m0, 'shellies/listerby/emeter/0/total_returned', ... (5 bytes)) shellies/listerby/emeter/0/total_returned 537.4 Client (null) received PUBLISH (d0, q0, r0, m0, 'shellies/listerby/emeter/1/power', ... (5 bytes)) shellies/listerby/emeter/1/power 83.62 Client (null) received PUBLISH (d0, q0, r0, m0, 'shellies/listerby/emeter/1/pf', ... (4 bytes)) shellies/listerby/emeter/1/pf 0.79 Client (null) received PUBLISH (d0, q0, r0, m0, 'shellies/listerby/emeter/1/current', ... (4 bytes)) shellies/listerby/emeter/1/current 0.45 Client (null) received PUBLISH (d0, q0, r0, m0, 'shellies/listerby/emeter/1/voltage', ... (6 bytes)) shellies/listerby/emeter/1/voltage 233.38 Client (null) received PUBLISH (d0, q0, r0, m0, 'shellies/listerby/emeter/1/total', ... (9 bytes)) shellies/listerby/emeter/1/total 2298273.3 Client (null) received PUBLISH (d0, q0, r0, m0, 'shellies/listerby/emeter/1/total_returned', ... (5 bytes)) shellies/listerby/emeter/1/total_returned 101.5 Client (null) received PUBLISH (d0, q0, r0, m0, 'shellies/listerby/emeter/2/power', ... (6 bytes)) shellies/listerby/emeter/2/power 182.31 Client (null) received PUBLISH (d0, q0, r0, m0, 'shellies/listerby/emeter/2/pf', ... (4 bytes)) shellies/listerby/emeter/2/pf 0.73 Client (null) received PUBLISH (d0, q0, r0, m0, 'shellies/listerby/emeter/2/current', ... (4 bytes)) shellies/listerby/emeter/2/current 1.07 Client (null) received PUBLISH (d0, q0, r0, m0, 'shellies/listerby/emeter/2/voltage', ... (6 bytes)) shellies/listerby/emeter/2/voltage 232.97 Client (null) received PUBLISH (d0, q0, r0, m0, 'shellies/listerby/emeter/2/total', ... (9 bytes)) shellies/listerby/emeter/2/total 2187798.7 Client (null) received PUBLISH (d0, q0, r0, m0, 'shellies/listerby/emeter/2/total_returned', ... (5 bytes)) shellies/listerby/emeter/2/total_returned 561.9 |
Install Node Red
bash <(curl -sL https://raw.githubusercontent.com/node-red/linux-installers/master/deb/update-nodejs-and-nodered)
Install Mosquito
sudo apt update && sudo apt upgrade
sudo apt install -y mosquitto mosquitto-clients
sudo systemctl enable mosquitto.service
mosquitto -v
show all what comes in regardless of topic (show all topics,, kind of…)
mosquitto_sub -d -v -t “#”
cat /etc/mosquitto/mosquitto.conf
sudo vi /etc/mosquitto/mosquitto.conf
|
1 2 3 4 5 6 7 8 9 10 11 12 13 14 15 16 17 |
# Place your local configuration in /etc/mosquitto/conf.d/ # # A full description of the configuration file is at # /usr/share/doc/mosquitto/examples/mosquitto.conf.example pid_file /run/mosquitto/mosquitto.pid persistence true persistence_location /var/lib/mosquitto/ log_dest file /var/log/mosquitto/mosquitto.log include_dir /etc/mosquitto/conf.d <mark style="background-color:#ea9629" class="has-inline-color">listener 1883 allow_anonymous true </mark> |
sudo systemctl restart mosquitto
Install PostgreSQL
(*) Do not forget to setup remote access to postgresql
|
1 2 3 4 5 6 7 8 9 10 11 12 13 14 15 16 17 |
sudo apt get install postgresql -y sudo apt install postgresql -y sudo systemctl status postgresql sudo su postgres sudo cat /etc/postgresql/13/main/pg_hba.conf sudo nano /etc/postgresql/13/main/pg_hba.conf Add a line like the one below to allow you to access PostgreSQL remotely (i.e. outside of the raspberry pi) <mark style="background-color:#ea9629" class="has-inline-color">host all all 192.168.68.0/24 trust</mark> sudo nano /etc/postgresql/13/main/postgresql.conf I have decided to put the database data on a separate disk, mostly to avoid too much IO to the SDCard which is not as durable as a proper disk. So I have mounted a USB drive and use it instead. <mark style="background-color:#ea9629" class="has-inline-color">data_directory = '/media/disk1/postgresql/13/main'</mark> sudo /etc/init.d/postgresql restart |
Create database, schema and table
|
1 2 3 4 5 6 7 8 9 10 |
create database listerby; create schema energy; CREATE TABLE energy.shelly ( "time" timestamp NOT NULL, feature varchar(50) NOT NULL, extra varchar(50) NULL, value decimal NULL ); |
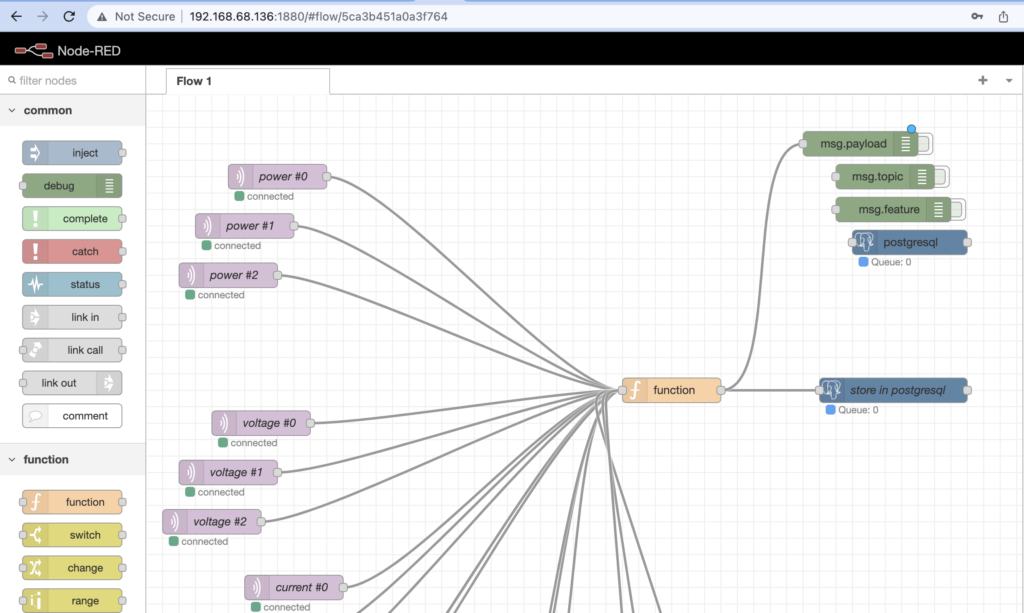
Node Red
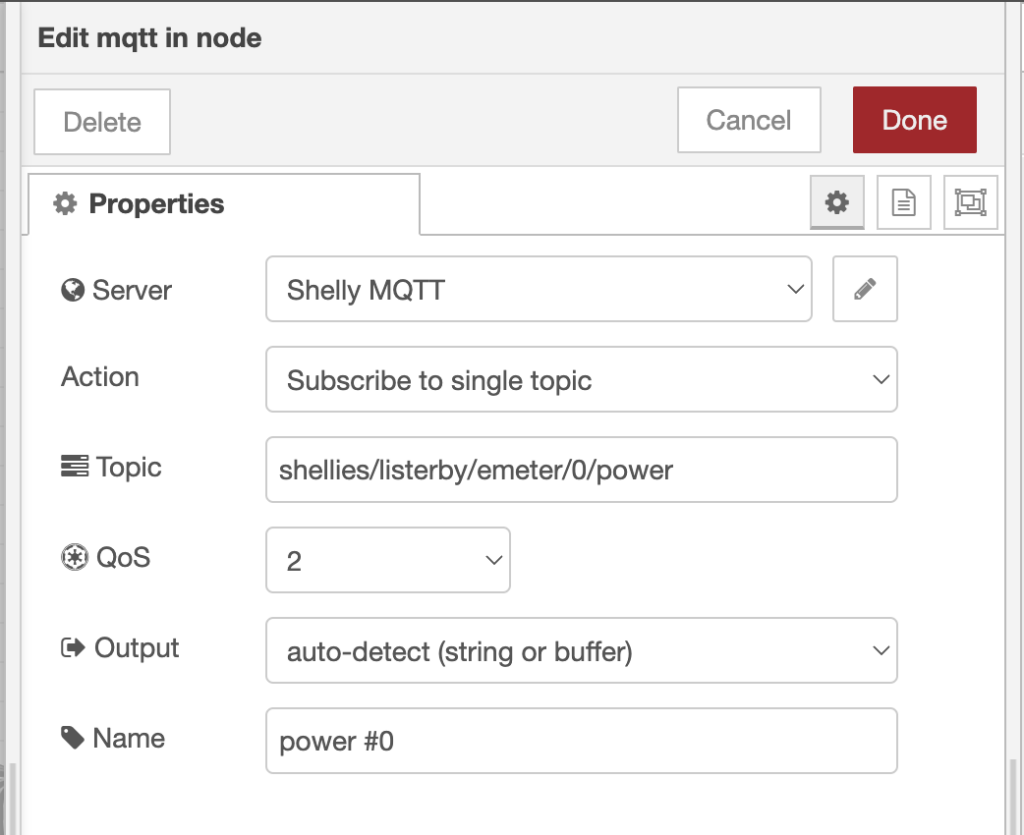
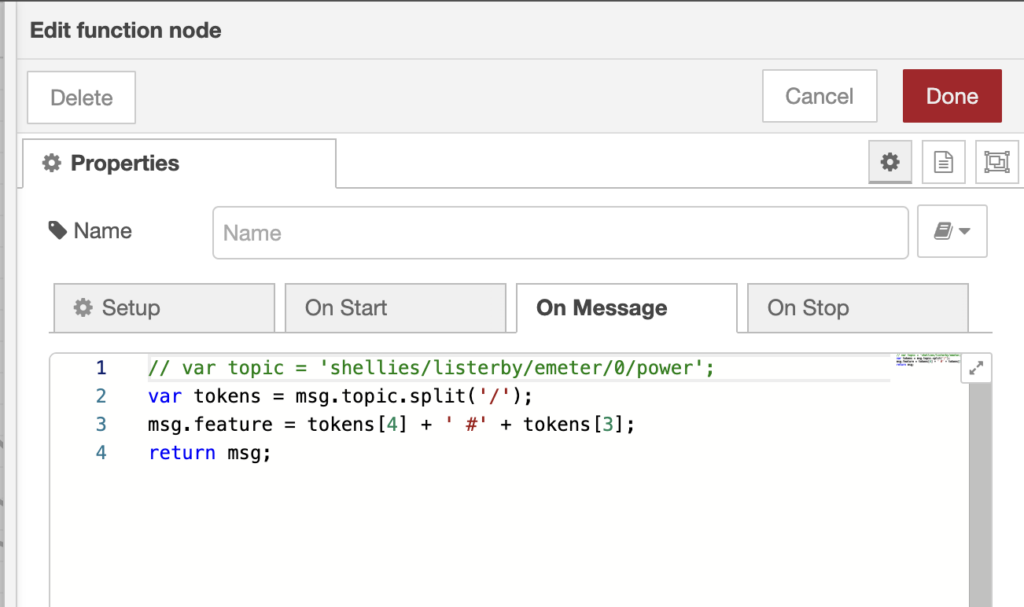
|
1 2 3 4 5 |
// var topic = 'shellies/listerby/emeter/0/power'; var tokens = msg.topic.split('/'); msg.feature = tokens[4] + ' #' + tokens[3]; return msg; |
Insert data into PostgreSQL
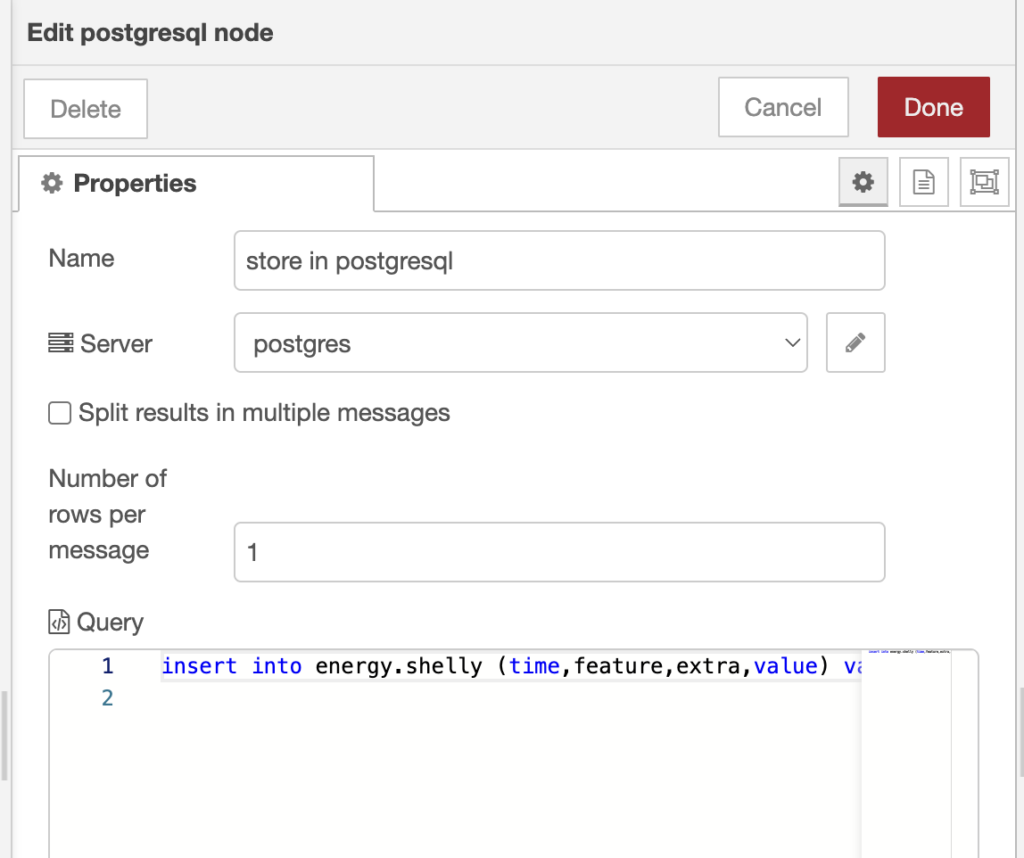
|
1 2 |
insert into energy.shelly (time,feature,extra,value) values (now(),'{{{msg.feature}}}', '', '{{{msg.payload}}}' :: DECIMAL); |


